
WHITE BALANCE....What it really is
Common sense essay on what white balance really is and how it works.
IceMan
4/16/202610 min read

Reader, kindly note that White Balance can be a highly technical subject and as such, I've made an effort to use everyday analogies to ease the 'geek'. I will keep adding posts on this issue in the future, both semi-techy and actual photographer/videographer usage.
You need to view this video BEFORE you go any further as it will help you understand WB much better.
https://youtu.be/qbHqW5ssnbw
A Master Class: Why Your Photos Look Like Garbage (And How Lord Kelvin, A Kitchen, and a Flash Help Can Fix It)
PART 1: The Secret of the Glowing Hole
The Concept: Before we talk about cameras, we have to talk about heat.
Most people think "Color" is a choice, like picking a paint color at Home Depot. It isn't. In the world of physics, Color is Energy.
Back in the 1800s, Lord Kelvin (William Thomson)* wasn’t thinking about "pretty sunsets." He was looking at a furnace. He used an "Isothermal Cavity"—essentially a dark, hollow box with a tiny hole. When he heated that box, the light coming out of the hole changed color.
At "low" heat, the light was a dull, angry Red.
As it got hotter, it turned Yellow.
At "white-hot" temperatures (like the Sun), it turned White.
If it got even hotter, it turned Blue.
To explain the "Hardware" side simply: Each pixel in a camera is like a tiny bucket catching "colored rain."
If you are under a tree, the "rain" is mostly Green.
If you are under a typical light bulb, the "rain" is mostly Red.
The camera doesn't really know what you are looking at. It just counts how much "red rain" vs "blue rain" it caught in a specific area.
The Localized Conflict: If the "red rain" is only falling on the left side of the sensor and "blue rain" is falling on the right, a global setting is just a "bad average." It’s like trying to find a "medium" temperature for a shower by sticking one hand in boiling water and the other in ice—on average, you’re "warm," but in reality, both hands are suffering.
The "Shooter" Takeaway: When you see a "Kelvin Number" (like 3200K or 5600K), you are in essence looking at a thermometer. You are telling the camera how "hot" the light source is. If you tell the camera the light is "Cool/Orange" but it's actually "Hot/Blue," your photo is going to look like it’s from another planet.
PART 2: The "Brain Lie" (Chromatic Adaptation)
The Concept: Why your eyes are better (and worse) than your sensor.
Your brain is the world’s best photo editor. When you walk into a living room lit by orange lamps, your brain says, "I know that wall is white," and it automatically subtracts the orange. You don't even see it.
A camera is stupid. It is just a "bucket" for light. It records exactly what hits it. If the light is orange, the camera records orange. White Balance is the manual process of telling the camera to "Lie like a human brain" so that white things actually look white.
PART 3: The Crosshair (Temperature vs. Tint)
The Concept: Light isn't just "Warm" or "Cold."
This is where the "armchair experts" fail. They think the "Temperature" slider is the only button.
The Temperature Axis: (Blue vs. Yellow). This follows Lord Kelvin’s temperature tests as the light spectrum falls along a curve.
The Tint Axis: (Green vs. Magenta). This is the "Medical" slider or the magic pill fix as this axis can address colors that fall outside of the temperature axis.
The Reality: Modern lights (LEDs and Fluorescents) are "spiky." They aren't "natural" like the Sun or a furnace. They often have a gross Green tint. If you only fix the "Temperature," you might make the photo less blue, but the person will still look like a sick zombie. You must use the Tint slider to add Magenta (the opposite of green) to make them look human again.
PART 4: The JPEG "Baked Cake" vs. The RAW "Ingredients"
The Concept: The point of no return when ‘baking’ image data.
Imagine you are making a cake.
JPEG is a Baked Cake: Once the camera saves a JPEG, the White Balance is baked in. If you realize later the cake is too salty (too blue), you can’t take the salt out. You can only try to "cover it up" with frosting. It always tastes (and looks) bad.
RAW is the Ingredients: A RAW file isn't a photo yet. It’s just a bag of flour, eggs, and sugar. If you realize you wanted a chocolate cake instead of vanilla, you can change the recipe before you bake it in Adobe Camera Raw (ACR).
The "Developer" Truth: In a RAW file, the "Temperature" and "Tint" aren't changes to the image—they are instructions for how to build the image.
PART 5: The ACR "Dropper" Trap
The Concept: Why clicking a "Gray Card" isn't a magic wand.
The Shooter thinks they can just click a gray card with the eyedropper and "fix" everything. They are wrong.
The Noise Trap: If the photo is dark and grainy, the dropper might land on an area dominated by green digital noise. ACR will then turn your whole photo Purple to "fix" that one area.
The Reflection Trap: If your subject is wearing a bright Blue shirt, that blue light is bouncing onto the gray card. If you click that card, you are balancing for "Blue light + Blue shirt," which will ruin the rest of the colors.
The Card Trap: Cheap gray cards aren't actually neutral. They are just "gray-ish" cardboard. If the card is wrong, the whole photo is wrong.
PART 6: "Sticky" Light (Color Contamination)
The Concept: Light is like a mirror.
Light doesn't just hit your subject; it bounces off everything else first.
If you stand on green grass, your chin turns green.
If you stand next to a red brick wall, your skin turns red.
A "Global" White Balance fix (the kind that your camera JPEG gets or what you do in ACR to adjust White Balance) can't fix this. If the camera or ACR "fixes" the green chin, it can turn the rest of your face purple.
PART 7: The Master’s Fix (Composition & Control)
The Concept: Stop trying to "fix" it and start "doing" it.
A Master Photographer doesn't spend 4 hours in ACR moving sliders. They spend 4 minutes fixing the composition.
1. The Composition Fix: If you see a green reflection on your subject, move the subject. Don’t try to out-math the physics. If you compose the shot so the "bad light" isn't hitting the person, you don't have to fix anything later.
2. The Flash (The Ultimate Truth): When you use a professional Flash, you are "bringing the Sun" with you.
The Flash is a known, clean, white light (usually 5600K).
By using a Flash, you "drown out" the crappy orange lamps and green office lights.
Because the Flash is "correct," the sensor records "correct" data.
The Final Lesson: The best White Balance setting is the one you don't have to change. If your composition is clean and your lighting is controlled, the "Temperature" and "Tint" sliders stay at zero. You aren't "driving" the software; you are commanding the environment.
The Shooter's Creed:
I will not trust the "Auto" button.
I will not believe the back of the camera screen (which is just a "baked" JPEG).
I will look for the "Why"—why is the light green? Why is it blue?
I will use my feet and my Flash to fix the light before I press the button.
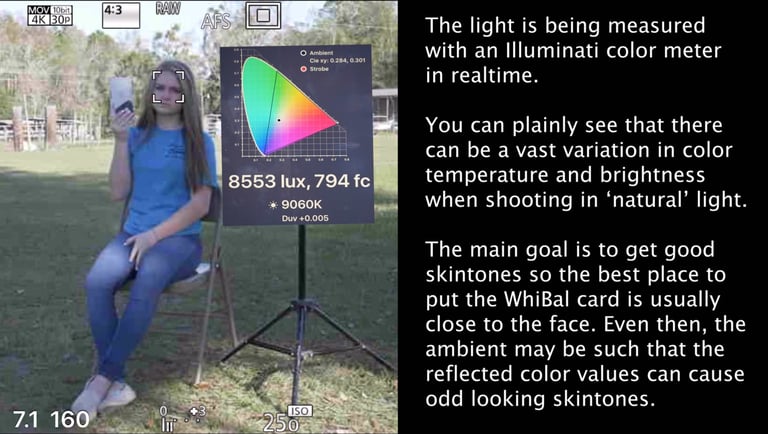
We need to elaborate a bit on wrong exposure and how it affects WB.
This is the final nail in the "fix it in post" coffin. Most shooters treat Exposure and White Balance as two different folders in their brain, but to a sensor, they are inextricably linked. If the exposure is wrong, the data for the White Balance literally doesn't exist.
To understand this, we have to look at the "Bucket" analogy one more time, but through the lens of Signal-to-Noise Ratio (SNR).
1. Under-Exposure: The "Mud" Problem
When a Shooter under-exposes an image (usually out of fear of "blowing out" the highlights), they are only filling their "color buckets" a tiny bit.
The Problem: At the bottom of every pixel bucket is a layer of "digital sludge" (electronic noise).
The WB Connection: Remember that White Balance is a multiplier. If you have a "cool" scene and you need to add warmth, ACR has to multiply the Red channel.
The Result: If there is only a tiny bit of "Red" signal sitting on top of a lot of "Sludge," ACR multiplies the sludge too. This is why "fixing" the White Balance on an underexposed photo results in "Mud"—vile, grainy, purple-ish shadows that make the skin look mottled and bruised.
The Shooter Takeaway: You can't balance light that isn't there. If you didn't catch enough photons, the "math" of White Balance has nothing to work with but garbage.
2. Over-Exposure: The "Clipping" Disaster
This is even more dangerous because it's a "silent killer" of color.
The Problem: Digital sensors have a hard ceiling. Once a pixel is full, it’s full. It records a value of "255" (or whatever the bit-depth max is) and stops.
The WB Connection: Imagine you are under orange light. Your Red channel fills up and "clips" (hits the ceiling) while your Blue channel is only half full.
The Disaster: When you go into ACR and try to fix the White Balance, the software tries to balance the Blue against the Red. But since the Red is "clipped," it’s just a flat line of white. There is no detail left.
The Result: You get those nasty, "neon" yellow-to-white transitions on skin highlights. The color data has been "decapitated."
3. Why Exposure Dictates "Color Accuracy"
A sensor is most accurate in its mid-tones.
In the Shadows, White Balance is destroyed by Noise.
In the Highlights, White Balance is destroyed by Clipping.
If a Shooter's exposure is off, they are pushing their color data into the "danger zones" where the ratios of Red, Green, and Blue are no longer honest.
4. The "Luminance" Secret (The Green Channel)
As we discussed, the Green channel in a Bayer sensor carries most of the "Brightness" (Luminance) information.
Because there are twice as many Green pixels, the camera uses Green as the "anchor" for exposure.
The Conflict: If you are in a room with a heavy Green Tint (cheap LEDs) and you expose "correctly" according to your meter, you might actually be over-exposing the Green channel while under-exposing the Red and Blue.
This is why a Shooter's photo can look "bright enough" but still have "dead" colors. The Green channel is saturated, but the Red and Blue channels (which carry the actual "skin tone" information) are still sitting down in the "sludge."
Summary for the Shooter:
Exposure is the Foundation: If the house is sinking (under-exposed) or the roof is gone (over-exposed), it doesn't matter what color you paint the walls (White Balance).
Flash is the Savior: This is why you use Flash. Flash allows you to push the exposure into that "sweet spot" (the middle of the sensor's range) where the Red, Green, and Blue pixels are all catching plenty of "clean" light without hitting the ceiling.
Correct Exposure = Clean Math: When the exposure is "thick" and "healthy," the White Balance sliders in ACR move smoothly and the colors look "rich." When the exposure is thin, the sliders just make the image look like a broken TV.
We’ve gone from the thermal radiation of a 19th-century furnace to the practical reality of why a flash and a bit of compositional common sense beat a "magic" software slider every time. If Shooters can just grasp that light is a physical ingredient and not just a setting on a screen, they've already won 90% of the battle against excessive post processing.
On a closing note, I was so busy talking about the "ingredients" that I forgot to mention the dirty window everyone is looking through.
You can have the most perfect, Kelvin-corrected, flash-lit RAW file in the world, but if you’re viewing it on a screen that hasn't been calibrated, you’re essentially a pilot flying through thick fog without a radio.
Here is the final, "Gotcha" reality check for the Shooter:
1. The Screen is a "Translator"
Most Shooters think their monitor is a "mirror" of their data. It isn't. It’s a translator, and most monitors aren’t that good at their job.
The Factory Lie: Monitors are sold to look "pretty," not "accurate." Out of the box, most screens are set to be too Blue and too Bright to make them pop on a showroom floor.
The Laptop Trap: If a Shooter is editing on a MacBook or a cheap PC laptop, the screen's "White Balance" changes every time they tilt the lid or change the room's brightness.
2. The Calibration (The Only "True" White)
Just like the camera needs a "baseline," the monitor needs a Look-Up Table (LUT).
The Tool: You use a Colorimeter (like a Spyder or an i1Display). It’s a sensor that sits on the screen and measures what the monitor thinks is Red, Green, and Blue.
The Correction: The software sends a signal for "Pure White" to the screen. If the sensor sees that the screen is actually a bit Cyan, it creates a profile that tells the computer: "Hey, this screen is biased; pull back on the Cyan so the human sees the real color."
3. The Environment (The Ultimate Contaminator)
This is the one that really gets them. If a Shooter is sitting in a room with yellow walls and a warm lamp, their brain "adjusts" to that room.
Even on a calibrated screen, the White Balance of the room will make the screen look wrong.
This is why master editors work in "neutral gray" rooms with dim, consistent lighting. If you edit a photo while sitting under a green fluorescent light, you will subconsciously add Magenta to the photo to "fix" what your eyes are seeing in the room.
4. Viewing the "Data" (The Histogram & Scopes)
Since we can’t trust our eyes or a cheap screen, we have to look at the Math.
The Histogram: Shows us if we’ve "clipped" the data (hit the ceiling).
The RGB Parade / Vectorscope: In ACR or video editors, these tools show the actual "height" of the Red, Green, and Blue channels.
The Takeaway: If the "Blue" mountain on your RGB Parade is higher than the "Red" mountain on a gray card, the image is blue. It doesn't matter if your screen looks "fine"—the numbers don't lie.
If the Shooter doesn't understand that the monitor is just an opinion and the Scopes/Histogram are the fact, they will spend their whole life chasing a "correct" color that changes every time they move to a different room.
In our next post we will go over indepth on some methods of setting white balance using a gray card, Photoshop and Lightroom.